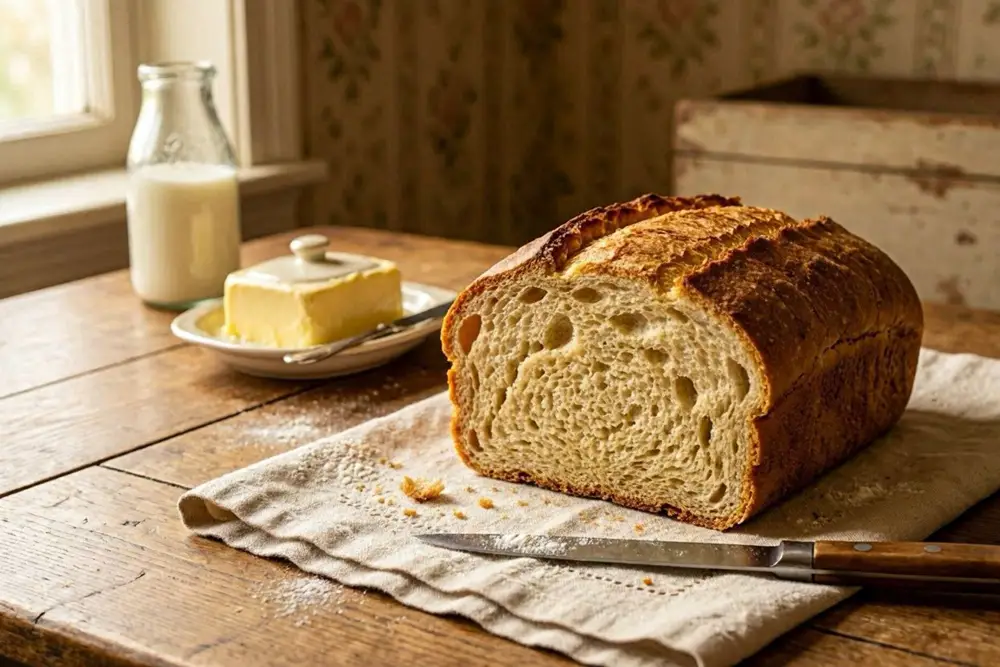
Potato Bread
A traditional Central European potato bread with an exceptionally soft crumb that stays fresh for several days — a hallmark of early 20th century home baking.
Historical recipe
Modernised adaptation of an early 20th‑century source. Not independently kitchen-tested by Attic Recipes. Quantities, temperatures, and food safety guidance have been updated for a contemporary kitchen — results may vary and errors may exist. Nutritional values, where provided, are estimates only and have not been laboratory tested. Always follow current food safety guidelines for your region. If you have a health condition, allergy, or dietary requirement, consult a qualified professional before preparing this recipe.
Use of this recipe is entirely at your own risk and subject to our Terms of Service and Privacy Policy. Attic Recipes accepts no liability for any adverse outcome.
- Gluten
- Dairy
- 1
Wash the potatoes and place them unpeeled in a large pot. Cover with cold water, bring to a boil, and cook until completely tender — about 25 minutes. Drain well and peel while still hot.
Tip Peeling hot potatoes keeps the flesh dry. Allow them to steam off for a minute or two on the board before pressing. - 2
Pass the peeled potatoes through a potato ricer or press into a large bowl. Spread the mash slightly and leave to cool to room temperature — it should be warm to the touch but not hot.
- 3
In a small bowl, combine the 7g instant dry yeast with a pinch of salt and 100ml of the lukewarm water. Stir briefly and leave for 5 minutes until slightly foamy.
Tip If using fresh cake yeast (21g), crumble it into the water and stir until dissolved. - 4
Sift the 2000g bread flour onto a large, clean work surface or into a very large bowl. Make a wide well in the centre. Add the yeast mixture and the cooled mashed potato. Begin to combine with your hands, drawing in the flour from the edges.
- 5
Add the 18g salt and the caraway seeds (if using). Pour in the remaining 300ml lukewarm water gradually, kneading as you go. You may not need all of it — stop adding water when the dough begins to feel cohesive. Knead firmly for 10–12 minutes until the dough is smooth, elastic, and pulls cleanly away from your hands and the surface.
Tip Potato dough is stickier than pure wheat dough. Resist the urge to add too much flour — a slightly tacky dough produces a softer loaf. - 6
Shape the dough into a ball and place it in a lightly floured bowl. Cover with a clean cloth or plastic wrap and leave in a warm, draft-free place to rise until doubled in size — approximately 1.5 to 2 hours.
- 7
Grease the two loaf tins generously with the 15g softened butter and dust with flour. Knock back the risen dough, divide it in two equal portions, and shape each into a loaf. Place in the prepared tins, cover loosely, and leave to prove for a further 45 minutes to 1 hour, until the dough crowns visibly above the tin edges.
- 8
Preheat the oven to 200°C (400°F) / 180°C fan. Bake the loaves for 40–45 minutes until deep golden brown. The loaves are ready when they sound hollow when tapped on the base.
Tip For a crispier crust, remove the loaves from their tins for the final 10 minutes of baking and return them to the oven directly on the rack. - 9
Transfer the baked loaves to a wire rack and leave to cool for at least 30 minutes before slicing. The crumb continues to set as it cools.
Nutrition Information per 1 slice (approx. 65g)
Nutritional values are approximate estimates and may vary based on specific ingredients used, preparation methods, and portion sizes.
Serving Suggestions
Slice thickly and serve with salted butter, lard spread, or fresh cheese. The soft crumb makes it well suited to soups and stews, where it absorbs broth without falling apart. Excellent with bean soup, paprika-based meat dishes, or simply with cold cuts and pickles.
About This Recipe
Potato bread occupies a quiet but important place in Central European home baking. The addition of cooked and pressed potato to a yeasted wheat dough does something simple and remarkable: it holds moisture. Where a plain white loaf begins to stale within a day, potato bread stays soft for three or four days — a practical advantage in households where baking happened once or twice a week, not daily. This was not an accident of taste but a deliberate technique, well understood by home bakers of the early 20th century.
The proportions here — one kilogram of potato to two kilograms of flour — produce a dough with a noticeably tender crumb and a slightly denser, more substantial texture than a pure white bread. It is not a light, airy loaf. It is a bread designed for eating with things: soups, spreads, cold meats, strong cheese. The optional caraway seeds are a small but characteristic detail, adding the particular warmth that appears throughout Central European bread traditions.
This recipe works with either a combined yeast-and-starter method as the original describes, or with instant dry yeast alone. Both produce a good loaf; the sourdough version produces a more complex flavour.
Why It Works
The starch in cooked potato is gelatinised, meaning it has already absorbed water and bonded with it. When incorporated into a dough, this gelatinised starch competes less with the gluten network than raw starch would, and it continues to hold moisture throughout baking and cooling. The result is a crumb that is soft without being gummy, and that retains its texture far longer than flour and water alone.
Pressing the potatoes through a ricer rather than mashing them matters more than it might seem. A smooth, dry mash distributes evenly through the dough without creating wet pockets or lumps that would disrupt gluten development. The drier the mash, the more predictable the water absorption — which is why boiling in the skin, then peeling and pressing while hot, is the method of choice.
Modern Kitchen Tips
- Weigh your potatoes after boiling and peeling, not before. You need 1000g of pressed mash, not 1000g of raw potatoes — expect some loss.
- Cool the mash fully before mixing — adding hot mash kills the yeast.
- The dough will feel stickier than pure wheat dough throughout kneading. This is normal. Resist the temptation to add excess flour, which would tighten the crumb.
- A stand mixer with a dough hook handles this dough well: 8 minutes on medium after initial incorporation.
- Doneness test: internal temperature of 93–95°C (200°F) on an instant-read thermometer is a reliable alternative to the knock test.
A staple of early 20th century Central European home baking, preserved and adapted for the modern kitchen.
The Story Behind This Recipe
Historical Context
Early 20th century recipes for potato bread typically called for a combination of commercial pressed yeast and homemade sourdough starter used together — the commercial yeast for reliable leavening power, the starter for flavour. Home bakers of the period often prepared the starter the evening before, mixing it with a little flour, salt, and water and leaving it in a warm place overnight. The ratio of one kilogram of potatoes to two kilograms of flour was a standard proportion in early 20th century home baking practice, and the technique of pressing the cooked potatoes reflects a practical preference for a smooth, dry mash that integrates cleanly into the dough. Caraway was noted as an optional addition, suggesting it was a regional or personal preference rather than a fixed component of the recipe.
Modern Kitchen Adaptation
The original recipe combines homemade sourdough starter and commercial fresh yeast. This adaptation uses instant dry yeast only, which is reliably available and produces consistent results. For a closer historical flavour profile, replace the instant yeast with 150g of active sourdough starter (100% hydration), reduce the water by approximately 75ml, and allow a long cold bulk fermentation overnight in the refrigerator before shaping. Lard was the likely original fat for greasing the tins; butter is used here as a direct substitute. The oven temperature of 200°C is estimated — period recipes of this type typically described only a warm oven, without specifying a temperature.
This recipe is an independent modern adaptation developed from historical sources in the public domain. It is provided for informational and educational purposes only and does not constitute professional dietary, nutritional, or medical advice. Food preparation involves inherent risks. The reader assumes full responsibility for safe food handling, ingredient sourcing, and adherence to current local food safety guidelines. The site operator accepts no liability for outcomes resulting from the preparation or consumption of this recipe.
One recipe.
Every week.
You Might Also Like
More recipes from the same category

Emmental Cheese Bars
Flaky millet pastry strips with Emmental, kajmak, egg yolks, and red pepper—savory tea snack from early 1900s Central Europe.

Flaky Fatback Pastries with Ham or Cheese
Tender, layered pastries made with hand-laminated pork fatback dough, filled with creamy ham or a rich egg-and-cheese mixture.

Fatback Walnut Roll
Flaky yeasted pastry laminated with raw pork fatback, filled with milk-cooked walnuts, raisins, and lemon zest. Sliced and dusted with sugar.