Fried Peppers in Oil and Vinegar
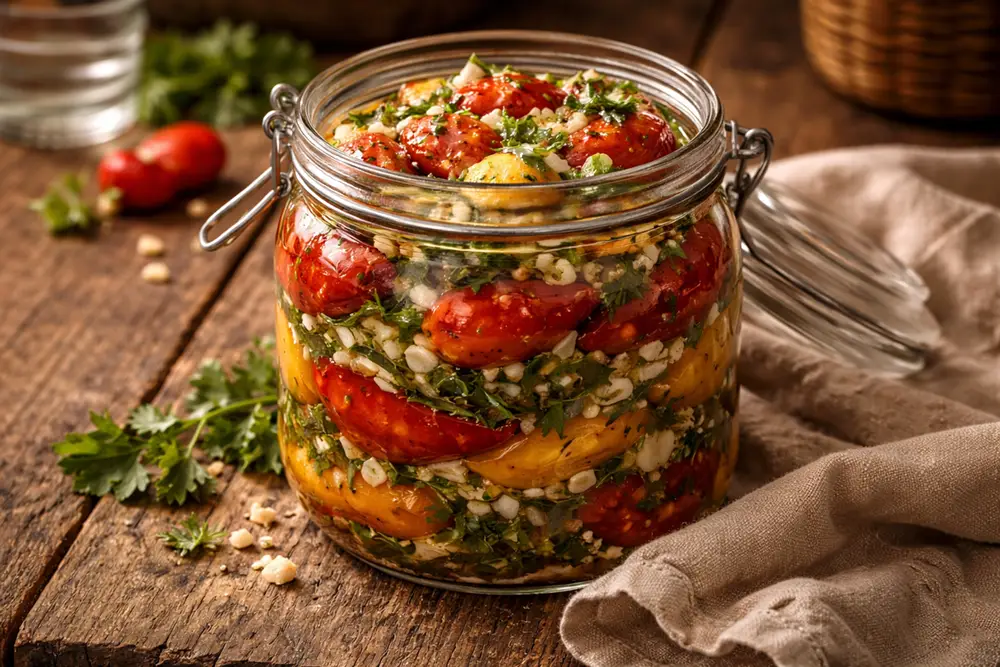
Pan-fried peppers layered with garlic, parsley, celery, and horseradish, then preserved in wine vinegar — a tangy, aromatic winter relish.
Historical recipe
Modernised adaptation of an early 20th‑century source. Not independently kitchen-tested by Attic Recipes. Quantities, temperatures, and food safety guidance have been updated for a contemporary kitchen — results may vary and errors may exist. Nutritional values, where provided, are estimates only and have not been laboratory tested. Always follow current food safety guidelines for your region. If you have a health condition, allergy, or dietary requirement, consult a qualified professional before preparing this recipe.
Use of this recipe is entirely at your own risk and subject to our Terms of Service and Privacy Policy. Attic Recipes accepts no liability for any adverse outcome.
- Celery
Additional notes
-
Warning
Vinegar essence (acetic acid concentrate, typically 70–80%) must never be used undiluted. To achieve a safe 5–6% preserving acidity, mix 1 part essence with approximately 12 parts cold water. Undiluted or incorrectly diluted essence can cause severe chemical burns to the mouth, throat, and digestive tract.
-
Warning
Peppers are a low-acid vegetable (pH 4.65–5.45). Without water bath canning, safety depends entirely on the vinegar fully penetrating and acidifying all layers. Ensure peppers are completely submerged at all times and that vinegar reaches between all layers. If you are unable to verify adequate acidification, discard rather than consume. Botulism produces no visible, smell, or taste warning signs.
-
Warning
Ensure peppers are fully submerged in vinegar at all times. Any pepper exposed to air above the vinegar line is at risk of mold growth. If mold appears on the surface after sealing, discard the entire jar.
-
Caution
Frying wet peppers in hot oil causes violent splatter and burn hazard. Ensure every pepper is completely dry before placing in hot oil. Keep a lid nearby to shield against splatter.
-
Note
This preserve contains vinegar and is not suitable for people with gastroesophageal reflux disease (GERD) or acid sensitivity. The high garlic content may also cause digestive discomfort in sensitive individuals.
- 1
Sterilize the jar and lid: wash thoroughly with hot soapy water, rinse well, then place upright in a 120°C (250°F) oven for 15 minutes. Remove with clean tongs and allow to cool completely before filling.
- 2
Wash the 2 kg of peppers, cut off their stems, and pierce each pepper 3–4 times with a needle or thin skewer. This prevents bursting during frying. Pat every pepper completely dry with a clean cloth — surface moisture causes dangerous oil splatter.
- 3
Heat the 100 ml of sunflower oil in a large heavy-bottomed skillet over medium-high heat. Working in batches to avoid crowding, arrange the peppers in the hot oil and turn them frequently until blistered and evenly browned on all sides, approximately 5–7 minutes per batch. Transfer the fried peppers to a wide bowl and repeat until all peppers are done. Allow them to cool completely to room temperature — do not proceed until they are fully cooled.
- 4
While the peppers cool, prepare the aromatic mixture: peel and finely chop the 6 garlic cloves; finely chop the 2 bunches of parsley and 2 bunches of celery stalks with leaves; peel the 150g of horseradish root and slice into thin rings. Combine everything in a bowl with the 20 whole peppercorns and 1.5 tsp of salt. Mix well.
- 5
Pack the sterilized jar in alternating layers: four rows of cooled peppers, then one layer of the aromatic mixture. Continue layering until all peppers and aromatics are used. Leave 1–2 cm of empty headspace at the top of the jar — the period instruction of 'four finger-widths' was calibrated for smaller jars and translates to approximately this gap in a modern 3L jar.
- 6
Pour the 450 ml of wine vinegar slowly over the layered peppers until they are fully submerged. If any peppers protrude above the vinegar, press them down gently with a clean spoon and add more vinegar as needed. The peppers must remain fully submerged.
- 7
Seal the jar tightly with an airtight lid. Store in a cool, dark place — a cellar, pantry, or the bottom shelf of a refrigerator. Sealed jars keep for up to 12 months in optimal conditions. Allow at least 48 hours before opening; flavor develops fully over 1–2 weeks. Once opened, refrigerate and consume within 4 weeks.
Nutrition Information per 1 serving (approx. 150g)
Nutritional values are approximate estimates and may vary based on specific ingredients used, preparation methods, and portion sizes.
Serving Suggestions
Serve alongside roasted or grilled meats, cold cuts, or aged cheese. Works well as part of a preserved vegetable platter. Also good chopped roughly and stirred into cooked white beans or lentils.
About This Recipe
This is a preserve built on a simple idea: fry the peppers first, then let vinegar and aromatics do the rest. Pan-frying before preserving softens the flesh just enough to absorb the brine while keeping the pepper intact — weeks in the jar and they still hold their shape, still have texture, still taste like something rather than nothing.
The aromatic mixture layered between the peppers — garlic, flat-leaf parsley, celery with its leaves, horseradish sliced into rings, whole peppercorns — is a classic Central European preserving base. Each element contributes: garlic and horseradish are genuinely antimicrobial at the concentrations used here, parsley and celery add green bitterness that balances the vinegar’s sharpness, and the peppercorns give a slow background heat that builds over the weeks of curing.
The result is not a pickle in the modern Western sense. It is sharper, more pungent, more layered — the kind of thing that was opened in December alongside roast pork and cold cuts, when the summer garden was long gone.
Why It Works
Vinegar preservation works by lowering the pH of the food environment below 4.6, the threshold at which Clostridium botulinum cannot survive. Wine vinegar at 5–6% acidity achieves this reliably when the peppers are fully submerged and the jar is properly sealed. The frying step matters here: raw peppers float and resist full saturation; fried peppers are denser, sink into the brine, and absorb the vinegar through the needle-pierced skin.
The headspace instruction — “four fingers from the top” — is not arbitrary. It allows for minor liquid expansion without creating pressure that could compromise the seal, while keeping the jar full enough that the peppers stay below the vinegar line.
Horseradish in this context is both flavoring and functional: it contains allyl isothiocyanate, the same compound responsible for its sharp flavor, which has documented antimicrobial properties. Its presence in preserved vegetable recipes of this period reflects intuitive food technology that long preceded the science that explained it.
Modern Kitchen Tips
Use firm, thick-walled peppers — banana peppers, sweet pointed peppers, or similar. Thin-skinned varieties collapse during frying and turn to mush in the jar. The pepper should be able to hold its shape after 5–7 minutes in hot oil.
Fry in batches without crowding. Crowded peppers steam instead of fry, which defeats the purpose of the step — you want blistered, slightly charred skin, not soft steamed flesh.
The jar must be sterilized, not just clean. Soap and hot water remove dirt; 15 minutes in a 120°C oven kills the microorganisms that would otherwise compete with your preserve.
A classic of early 20th century home cooking, preserved and adapted for the modern kitchen.
The Story Behind This Recipe
Historical Context
Early 20th century home preserving relied on vinegar acidity rather than heat processing to stabilize layered vegetable preserves of this type. Home cooks of the period used wine vinegar or diluted acetic acid essence interchangeably depending on what was available — essence was cheaper and more shelf-stable, while wine vinegar gave a more complex flavor. The 'four finger' headspace instruction is a period-typical approximation that corresponds closely to the modern recommended 2–2.5 cm headspace for vinegar-packed preserves. Pan-frying before preserving was a standard technique for peppers in this tradition: it softens the flesh enough to absorb the brine while maintaining enough structure to remain intact after weeks in the jar. The aromatic mixture of garlic, parsley, celery, and horseradish was a common preserving base across Central European home kitchens of the era, functioning as both flavoring and supplementary antimicrobial layer.
Modern Kitchen Adaptation
Jar sterilization has been added as a mandatory step — the period preparation assumed clean jars without specifying sterilization method or duration. Pepper quantity is estimated at 2 kg, consistent with the proportions of the aromatic mixture. Oil quantity is estimated at 100 ml, sufficient for frying 2 kg of peppers in batches without burning. Vinegar quantity is estimated at 450 ml, sufficient to fully submerge peppers in a 3L jar. Garlic quantity has been corrected to 6 cloves — the period preparation almost certainly intended individual cloves rather than whole heads, as 6 full heads would be disproportionate to the other aromatics. Salt quantity is estimated at 1.5 tsp for the aromatic mixture. Headspace has been corrected to 1–2 cm, consistent with modern vinegar preserve guidelines — the period 'four finger' instruction was written for smaller jars. If using vinegar essence instead of wine vinegar, it must be diluted to 5–6% acidity before use: mix 1 part 70% essence with approximately 12 parts cold water and verify acidity before adding to the jar.
This recipe is an independent modern adaptation developed from historical sources in the public domain. It is provided for informational and educational purposes only and does not constitute professional dietary, nutritional, or medical advice. Food preparation involves inherent risks. The reader assumes full responsibility for safe food handling, ingredient sourcing, and adherence to current local food safety guidelines. The site operator accepts no liability for outcomes resulting from the preparation or consumption of this recipe.
One recipe.
Every week.
You Might Also Like
More recipes from the same category
Whipped Apricot or Peach Preserve (No-Cook)
A silky, pale fruit spread made by whipping raw apricot or peach puree with sugar - no cooking required.
Apricot Fruit Paste
Sieved ripe apricots cooked with equal weight sugar and lemon juice, poured into molds and air-dried — from early 20th century Central European kitchens.
Blackberry and Cornelian Cherry Marmalade
Rich preserve combining tart cornelian cherries with sweet blackberries, cooked to thick consistency with a traditional two-fruit method.