How to Stretch Pastry Dough by Hand: The Tablecloth Method
A look at the traditional technique of hand-stretching pastry dough over a tablecloth, including the dough, the rest period, and the stretch itself.
Introduction
Before rolling pins became the standard tool for pastry, home cooks across Central Europe had another method entirely: stretching the dough by hand over a cloth-covered table until it became thin enough to see through. This technique produced the paper-thin layers used in strudels, pies, and other layered pastries, and for many households it was the faster of the two methods once it had been learned.
This is a technique that lives mostly in muscle memory, passed from one generation to the next at the kitchen table rather than written down in detail. What follows is an attempt to put that process into words: the dough itself, the rest period that makes stretching possible, and the stretch itself, along with what to do when things don’t go perfectly.
The Dough
The dough for hand-stretched pastry is simple: flour, a little salt, a spoonful of oil, and enough cold water to bring it together. The flour is sifted onto a work surface, a well is formed in the center, and the salt, oil, and water are added to that well before the dough is brought together by hand.
What matters most here isn’t the ingredient list but the kneading. The dough needs to be worked by hand until it starts to pull away cleanly from both the hands and the work surface. At that point, small blisters typically appear on the surface of the dough, a sign that it has been worked enough. This is a tactile process rather than a timed one: the dough tells you when it’s ready, not the clock.
The Rest
Once the dough has come together, it’s divided into smaller portions, lightly rolled or shaped, brushed with melted fat, and covered to rest for 15 to 20 minutes. This rest period isn’t optional. Gluten, the elastic protein network that forms when flour is hydrated and worked, tightens up during kneading. Resting allows that network to relax, which is what makes it possible to stretch the dough thin without it springing back or tearing.
While the dough rests, it’s a good time to prepare the work surface: a large table covered with a clean cloth, with enough room to walk around it on at least two sides, and a pan of melted fat kept warm nearby for brushing between layers.
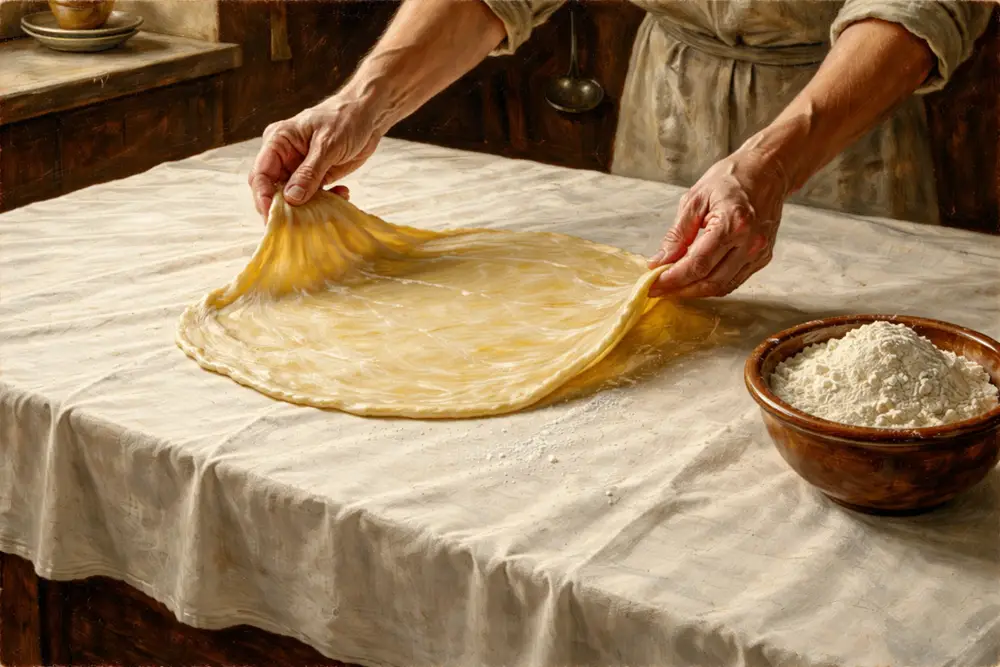
The Stretch
This is the part that’s hardest to describe and easiest to feel once you’ve done it a few times. Working with both hands, the dough is first worked outward from the center using loosely closed fists, gradually thinning the middle of the sheet as much as possible. The sheet is then laid down flat on the cloth-covered surface, and both hands work from the edges, pulling and stretching evenly outward, while also returning periodically to gently stretch the center so it doesn’t lag behind the edges in thickness.
As the sheet gets thinner, any thick or uneven edges are torn off and set aside; these trimmings get folded back into the next portion of dough before it goes through its own rest and stretch. The goal is a sheet thin enough to see through, but not so dry that it becomes brittle and starts to crack on its own. A sheet that’s still slightly damp can be folded or rolled for filling; one that’s gone too dry will crack before you get the chance.
If a sheet tears partway through stretching, it isn’t a failure — the torn dough can be gathered, rested again, and stretched a second time. And if a particular batch of dough simply refuses to stretch well by hand, the same dough can usually still be rolled out with a rolling pin instead. In the rare case where neither method works, the dough doesn’t have to be wasted: it can be reworked into a single flatbread rather than discarded.
Rolling Pin Variations
Alongside hand-stretching, rolling pins were also used to develop pastry dough, and different regions within Central Europe favored different rolling pin thicknesses depending on how thin the dough needed to be and the type of pastry being made — some traditions favored a thicker pin for general pastry development, while others used thinner pins capable of producing very fine sheets, closer to what’s needed for delicate layered pastries like baklava.
A firmer dough, sometimes made with whole eggs added to the mixture, was typically reserved for rolling pin work rather than hand-stretching. This dough was divided into small portions, rolled out thin one at a time, brushed or sprinkled with melted fat, and layered as needed. A related dough, enriched with egg yolks and a small amount of wine, rum, or brandy in place of some of the water, was used for a different family of pastries made by the same general method.
A Note on Aged Flour
Older instructions for this technique often specified using flour that had been set aside and aged for some time before use, sometimes for several weeks, rather than flour that had been freshly milled. This wasn’t an arbitrary preference. Wheat flour’s gluten-forming proteins, gliadin and glutenin, undergo changes over time as the flour is exposed to air, and these changes were understood to affect how the resulting dough behaved when stretched.
The general relationship between flour treatment and dough extensibility is well established: gliadin contributes to a dough’s ability to stretch, while glutenin contributes to its elasticity and structure, and the balance between the two affects how a dough handles. Research into flour oxidation also shows that the relationship isn’t simply “more oxidation equals more stretch” — at certain levels, oxidation can make a dough less extensible rather than more. The precise mechanism behind why aged flour specifically was favored for hand-stretched pastry in home kitchens of the period isn’t something that’s been directly studied, but it sits within this broader, well-documented area of flour chemistry. In commercial baking today, similar effects are achieved through controlled flour treatments rather than simply waiting.
Practical Takeaways
Hand-stretching pastry dough is a technique best learned by doing, but a few things make the difference between a frustrating first attempt and a workable one: knead the dough until it pulls cleanly away from your hands, don’t skip the rest period, and work the dough evenly from the edges toward the center rather than focusing on one spot. If a sheet tears, it isn’t the end of that piece of dough — gather it, rest it, and try again, or switch to a rolling pin if hand-stretching isn’t cooperating that day.
Attic Recipes — digitizing and adapting Central European home cooking from the early twentieth century.
Frequently Asked Questions
01What's the difference between hand-stretched and rolled pastry dough?▶
Hand-stretched dough is pulled and worked outward over a cloth-covered surface until it becomes very thin, while rolled dough is flattened with a rolling pin. Hand-stretching is generally faster once the technique is learned, while rolling requires more practice to achieve the same thinness.
02Why does the dough need to rest before stretching?▶
Resting allows the gluten network formed during mixing to relax, which makes the dough easier to stretch without tearing. A rest of 15 to 20 minutes, covered, is typical before stretching begins.
03What happens if the dough tears while stretching?▶
If a sheet tears during hand-stretching, the torn portions can be gathered back together and rested again before trying once more. If the dough continues to tear, it can instead be rolled out with a rolling pin, or the entire batch can be reworked into a single flatbread instead.
04Why did older recipes call for aged flour?▶
Aged flour was thought to produce a more extensible dough that stretched without tearing, an effect linked to gradual changes in the flour's gluten-forming proteins over time. Today, similar effects are achieved through commercial flour treatments or by resting the dough longer.